react-router-dom

  • 不同的路径渲染不同的组件
  • 有两种实现方式
    • HashRouter:利用hash实现路由切换
    • BrowserRouter: 利用h5 Api实现路由的切换

h5中的路由

hash

默认地址栏后面会加hash,如 http://www.a.com/index.html#

hash 模式 前端路由的特点,不刷新,但是可以根据路径显示不同的内容
hash 不是浏览器的规范,优点:兼容性比较好,缺点是不美观 (#/…)

1
2
3
<a href="#/home">首页</a>
<a href="#/abort">关于</a>
<div id="container"></div>

点击a标签,可以看到路由变化了,但是页面没有改变

1
2
3
4
5
1)初始化路径
一般启动服务的时候初始进来是index.html,需要跳转到/页面或者本身的页面
```javascript
window.location.hash = window.location.hash.slice(1) || '/';
// window.location.hash.slice(1) 如果进来是#/user就把值加过去 或者 '/' ,‘#’ hash是不用写的,默认就有

2)监听
根据路径渲染div里面的内容

1
2
3
4
container.innerHTML = window.location.hash;
window.addEventListener('hashchange',function{
container.innerHTML = window.location.hash;
})

history

window.history
window.history.pushState({},null,’/‘)

默认我们的h5 history api 它不支持强制刷新,会找不到对应的路径(比如当前是/页面,通过window.history.pushState({},null,’/user’),路由改变为/user,这时候刷新,页面会显示 Cannot GET /user)
如果页面找不到对应的路径,可以跳转到首页,在通过window.history.pushState跳到这个/user页面上

1
2
3
4
5
6
7
8
9
<a onclick="push('/')">首页</a>
<a onclick="push('/abort')">关于</a>
<div id="container"></div>
<script>
function push(path){
window.history.pushState({},null,path);
container.innerHTML = path;
}
</script>

点击a标签可以看到页面和路径都变化,且浏览器最上角的前进后退按钮历史数据一直在叠加,可以通过window.history.length看到

1)默认前进、后退是不会调用pushState方法的

1
2
3
4
5
window.addEventListener('popstate',function(){ // 只有在点击[前进][后退]按钮时才触发
console.log(window.location); // 路径相关的信息
console.log(window.history); // 历史相关的方法
container.innerHTML = window.location.pathname;
})

React中的路由

HashRouter | BrowserRouter

npm install –save react-router-dom

使用

1
2
3
4
5
6
7
8
9
10
11
12
13
14
15
16
17
18
19
20
21
22
import React from 'react';
import ReactDOM from 'react-dom';
import Home from './pages/Home';
import User from './pages/User';
import Profile from './pages/Profile';
// react路由需要引入 内部提供了很多组件
// 提供一个路由容器,里面放着一条条的路由

// 如果用BrowserRouter webpack 插件 history-fallback-api 如果路径找不到会跳转到首页
// 这里用HashRouter
import {HashRouter as Router, Route} from 'react-router-dom';

ReactDOM.render(
// 和react-redux一样 主要提供一些属性集合方法,Router提供属性和方法
<Router>
<Route path="/" exact component={Home} />
<Route path="/user" component={User} />
<Route path="/profile" component={Profile} />
</Router>,
document.getElementById('root')
);
// exact 精确匹配

实现

Router提供属性和方法,父组件提供,子组件(Route)拿
在Home组件中打印

1
2
render() {
console.log(this.props);

打印如下:

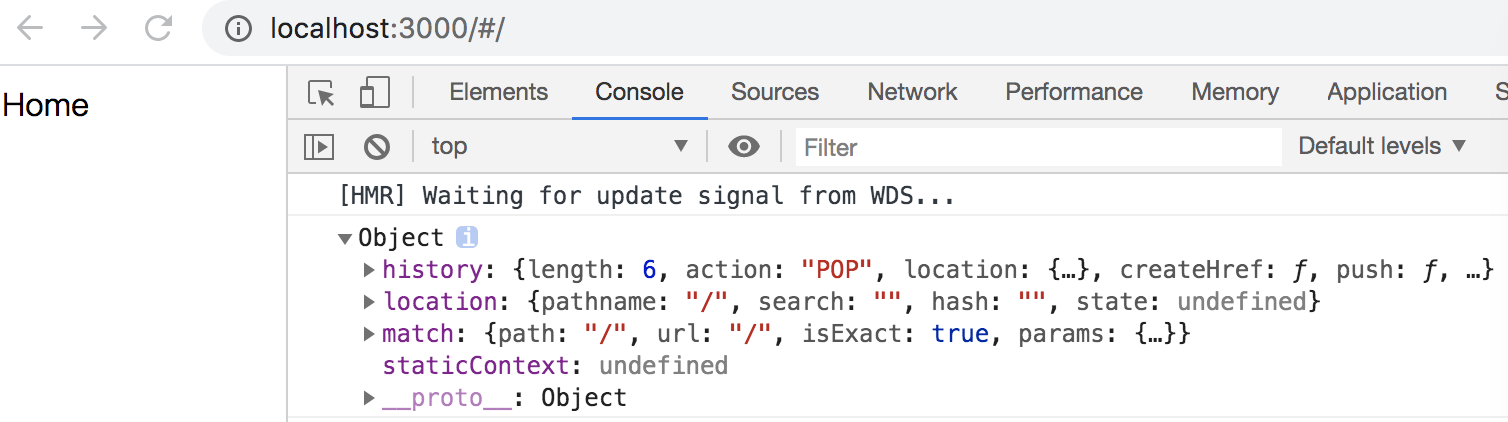
这里的 history、location 不是原生windows上的,是自己封装的 math指匹配到的信息:路径、路径参数、是否是精确匹配

步骤

1) HashRouter 要提供一个对象 history location match, 传递给后代组件 ,更新视图(setState)
2) Route 路由 主要的工作是拿到父组件中路径 和自己身上的path比较是否相等,如果相等渲染自己的component即可

1.

index.js

1
import {HashRouter as Router, Route} from './react-router-dom';

新建 ./src/react-router-dom/index.js

1
2
3
4
5
6
7
import HashRouter from './HashRouter';
import Route from './Route';

export {
HashRouter,
Route
}

新建 ./src/react-router-dom/HashRouter.js

1
2
3
4
5
6
7
8
9
10
11
12
13
14
15
16
17
import React, { Component } from 'react';
import Context from './context';

// 提供一个对象
class HashRouter extends Component {
render() {
let value = {

}
return (
<Context.Provider value={value}>
{this.props.children}
</Context.Provider>
);
}
}
export default HashRouter;

父组件提供值

新建 ./src/react-router-dom/Route.js

1
2
3
4
5
6
7
8
9
10
11
12
13
14
import React, { Component } from 'react';
import context from './context';

class Route extends Component {
static contextType = context;
render() {
return (
<div>
Route
</div>
);
}
}
export default Route;

子组件拿到值去匹配

新建 ./src/react-router-dom/context.js

1
2
3
4
// 提供一个上下文环境
import React from 'react';

export default React.createContext();

2.

HashRouter.js

1
2
3
4
5
6
7
8
9
10
11
12
13
14
15
16
17
18
19
20
21
22
23
24
25
26
27
28
29
30
31
32
33
34
35
36
import React, { Component } from 'react';
import Context from './context';

// 提供一个对象
class HashRouter extends Component {
state = {
location: {
// 如果地址是#/user就直接赋过去,如果是起始localhost:3000,就加一个'#/',‘#’因为是hash会自动添加
pathname: window.location.hash.slice(1) || '/',
state: null
}
}
componentDidMount() {
// 组件加载完毕 默认跳转到首页,如果有就采用默认的
window.location.hash = window.location.hash.slice(1) || '/';
window.addEventListener('hashchange',()=>{
this.setState({
location:{
...this.state.location,
pathname: window.location.hash.slice(1)
}
})
})
}
render() {
let value = {
location: this.state.location
}
return (
<Context.Provider value={value}>
{this.props.children}
</Context.Provider>
);
}
}
export default HashRouter;

Route.js

1
2
3
4
5
6
7
8
9
10
11
12
13
14
15
16
import React, { Component } from 'react';
import context from './context';

class Route extends Component {
static contextType = context;
render() {
console.log(this.context); // 获取到的是父组件(Router)提供的value的值
console.log(this.context.location.path);
return (
<div>
Route
</div>
);
}
}
export default Route;

浏览器地址改为 http://localhost:3000/#/user console.log输出: 3个location的对象和/user

3.

在Route中匹配组件

1
2
3
4
5
6
7
8
9
10
11
12
13
14
15
16
17
18
19
20
21
22
23
import React, { Component } from 'react';
import context from './context';

class Route extends Component {
static contextType = context;
render() {
// 这个path属性是当前真正的请求路径
let pathname = this.context.location.pathname;
// 获取我们在<Route></Route> 定义的路径和组件
// exact 表示是否严格匹配
let { path, component: Component, exact=false } = this.props;
let props = { // 将context中的属性传递下去,之前在Home组件中 this.props能打印出来
...this.context // context中有location
}
// 如果路径渲染成功,就渲染对应的组件
if(path === pathname){
return <Component {...props} />
}
// 否则就不进行渲染操作
return null;
}
}
export default Route;

将地址栏地址改为http://localhost:3000/#/user | http://localhost:3000/#/ | http://localhost:3000/#/profile 都能匹配到相应的组件

4.1 原生

index.js

1
2
3
4
5
6
7
8
9
10
11
12
13
14
15
16
17
18
19
20
21
22
23
import React from 'react';
import ReactDOM from 'react-dom';
import Home from './pages/Home';
import User from './pages/User';
import Profile from './pages/Profile';
// Link
import {HashRouter as Router, Route, Link} from 'react-router-dom';

ReactDOM.render(
<Router>
<>
<nav>
<Link to={{pathname:'/', state:{title:'哈哈'}}}>首页</Link>
<Link to="/user">用户</Link>
<Link to="/profile">个人中心</Link>
</nav>
<Route path="/" exact component={Home} />
<Route path="/user" component={User} />
<Route path="/profile" component={Profile} />
</>
</Router>,
document.getElementById('root')
);

这里Link在页面上hash路由解析成如下:

1
2
3
4
5
<nav>
<a href="#/">首页</a>
<a href="#/user">用户</a>
<a href="#/profile">个人中心</a>
</nav>

4.2 手写

新建./src/react-router-dom/Link.js

1
2
3
4
5
6
7
8
9
10
11
12
import React from 'react';
import context from './context';
export default class Link extends React.Component{
static contextType = context;
render(){
let {to} = this.props;
// 这里有可能是hash也有可能是browser的,所以都采用方法点击的方式传递事件(hash的话直接href=”#/“跳转)
return <a onClick={()=>{
this.context.history.push(to) // 调用父组件的history的push方法,把写在Link上的to属性传过去
}}>{this.props.children}</a>
}
}

HashRouter.js

1
2
3
4
5
6
7
8
9
10
11
12
13
14
15
16
17
18
19
20
21
22
23
24
25
26
27
28
29
30
31
32
33
34
35
36
37
38
39
40
41
42
43
44
45
46
47
import React, { Component } from 'react';
import Context from './context';

class HashRouter extends Component {
state = {
location: {
pathname: window.location.hash.slice(1) || '/',
state: null // 初始为null
}
}
componentDidMount() {
window.location.hash = window.location.hash.slice(1) || '/';
window.addEventListener('hashchange',()=>{
this.setState({
location:{
...this.state.location,
pathname: window.location.hash.slice(1),
state: this.locationState, // 只有跳转的时候才会携带状态,如果用户刷新页面就会丢失,比如有一个列表,点击跳转详情页
}
})
})
}
locationState = null;
render() {
let value = {
location: this.state.location,
history: {
push: (to)=>{
if(typeof to === 'object'){
let {pathname, state} = to;
this.locationState = state; // 跳转时先存起来当前的状态
window.location.hash = pathname;
}else{
// 跳转路径,其实就是改变hash值
window.location.hash = to; // 改变hash上面line16就会监听到从而改变state
}
}
}
}
return (
<Context.Provider value={value}>
{this.props.children}
</Context.Provider>
);
}
}
export default HashRouter;

5. exact

5.1 path-to-regexp

将路径转化为正则

这个包react默认引用,不用安装

1
2
3
4
5
6
7
// 将路径转化成正则
const pathToRegExp = require("path-to-regexp");

let url = '/user';

let reg = pathToRegExp(url,[],{end: false});
console.log(reg); // /^\/user\/?(?=\/|$)/i 打印匹配出的路径

5.2

Route.js

1
2
3
4
5
6
7
8
9
10
11
12
13
14
15
16
17
18
19
20
21
22
import React, { Component } from 'react';
import context from './context';
import pathToRegExp from 'path-to-regexp';

class Route extends Component {
static contextType = context;
render() {
let pathname = this.context.location.pathname;

let { path, component: Component, exact=false } = this.props;
let reg = pathToRegExp(path,[],{end: exact}); // 获取每个Route中path上的路径正则
let props = {
...this.context
}
// 正则匹配路径
if(reg.test(pathname)){
return <Component {...props} />
}
return null;
}
}
export default Route;

6. Switch

这里使用原生的,当如下:

1
2
3
4
<Route path="/" exact={false} component={Home} /> 
<Route path="/user" component={User} />
<Route path="/profile" component={Profile} />

这里匹配到一个/user之后会继续向下匹配,当有多个匹配成功则页面上显示多个组件,使用 Switch之后

1
2
3
4
5
6
7
8
9
import {HashRouter as Router, Route, Link, Switch} from 'react-router-dom';
<Router>
<Switch>
<Route path="/" exact={true} component={Home} />
<Route path="/user" component={User} />
<Route path="/profile" component={Profile} />
</Switch>
</Router>

只匹配一次,匹配到了就不走下面了

6.1 手写

新建 ./src/react-router-dom/Switch.js

1
2
3
4
5
6
7
8
9
10
11
12
13
14
15
16
17
18
19
20
21
// 循环所有的孩子,如果一个路径匹配到就停止循环
import React, { PureComponent } from 'react';
import context from './context';
import pathToRegExp from 'path-to-regexp';
class Switch extends PureComponent {
static contextType = context;
render() {
let child = Array.isArray(this.props.children) ? this.props.children : [this.props.children];
for(let i = 0; i < child.length; i++){
let child = children[i]; // 这里已经是解析后的虚拟dom了,不是Route那个组件
let {path='/', exact=false} = child.props; // 虚拟DOM的机构里,属性就是在props里
let {pathname} = this.context.location;
let reg = pathToRegExp(path,[],{end: exact});
if(reg.test(pathname)){
return child;
}
}
return null;
}
}
export default Switch;

7. Redirect

当路径匹配不到就重定向到首页

1
2
3
4
5
6
7
8
import {HashRouter as Router, Route, Link, Switch, Redirect} from 'react-router-dom';
<Switch>
<Route path="/" exact={true} component={Home} />
<Route path="/user" component={User} />
<Route path="/profile" component={Profile} />
<Redirect to="/"></Redirect>
</Switch>

注意,这里Redirect必须要和Switch一起使用,不然导致死循环,因为/ 会一直向下匹配

7.1 手写

新建./src/react-router-dom/Redirect.js

1
2
3
4
5
6
7
8
9
10
11
import React, { Component } from 'react';
import context from './context';

class Redirect extends Component {
static contextType = context;
render() {
this.context.history.push(this.props.to); // 就是一个重定向的跳转
return null;
}
}
export default Redirect;

8. render

Route进行渲染的时候,有三种方式:
1、 第一种是Component
2、 第二种是render,会渲染render这个函数返回的内容
3、第三种是children

权限判断,如果没有登录就去登录页面
index.js

1
2
3
4
5
6
7
8
<Switch>
<Route path="/" exact={true} component={Home} />
<Route path="/user" component={User} />
{/* <Route path="/profile" component={Profile} /> */}
<Protected path="/profile" component={Profile} />
<Redirect to="/" />
</Switch>

新建 ./src/pages/Protected.js

1
2
3
4
5
6
7
8
9
10
11
12
13
import React from 'react';
import { Route, Redirect } from '../react-router-dom';
// 在渲染这个Protected组件的时候要做判断,判断当前用户是否登录,如果登录了,直接渲染Profile组件
// 如果没有登录,则直接跳转到登录页,等登录后再跳转回来

export default ({component:Component, ...rest})=>(
<Route {...rest} render={
props=>( // props={location, history, match} 当前页的location.pathname:'/profile' 登录成功之后还要跳回来
localStorage.getItem('isLogin') ? <Component {...props} /> : <Redirect to={{pathname:'/login',state:{from: props.location.pathname}}} />
)
}
/>
)

Route.js

1
2
3
4
5
6
7
8
9
10
11
12
let props = {
location: this.context.location,
history: this.context.history,
match
}
if(Component){
return <Component {...props} />;
}else if(render){
return render(props);
}else{
return null;
}

新建 ./src/pages/Login.js

1
2
3
4
5
6
7
8
9
10
11
12
13
14
import React, { Component } from 'react'

export default class Login extends Component {
handleClick = ()=>{
localStorage.setItem('logined','true');
if(this.props.location.state)
this.props.history.push(this.props.location.state.from);
}
render() {
return (
<button className="btn btn-primary" onClick={this.handleClick}>登录</button>
)
}
}

9. withRouter

把一个组件当成Route渲染出来,具有Route上的属性(history,location…等)

新建./src/react-router-dom/withRouter.js

1
2
3
4
5
6
import {Route} from '../react-router-dom';
export default function (Component) {
return props=>(
<Route component={Component}>}/>
)
}

新建一个NavHeader.js组件

1
2
3
4
5
6
7
8
9
10
11
12
13
import React, { Component } from 'react'
import {withRouter} from '../react-router-dom';
class NavHeader extends Component {
render() {
return (
<div className="navbar-heading">
<div className="navbar-brand" onClick={()=>this.props.history.push('/')}>首页</div>
</div>
)
}
}
export default withRouter(NavHeader);
// 用了withRouter,所以this.props.history.push有这个方法,这个history是Route上的属性

10. BrowserRouter

BrowserRouter 用的history对象来实现, history.pushState()

新建./src/react-router-dom/BrowserRouter.js

1
2
3
4
5
6
7
8
9
10
11
12
13
14
15
16
17
18
19
20
21
22
23
24
25
26
27
28
29
30
31
32
33
34
35
36
37
38
39
40
41
42
43
44
45
46
47
48
49
50
51
52
53
54
55
56
57
58
59
60
61
62
63
64
65
66
67
68
69
70
import React, { Component } from 'react'
import Context from './context';
(function (history) {
var pushState = history.pushState;
history.pushState = function (state,title,pathname) {
if (typeof window.onpushstate == "function") {
window.onpushstate(state,pathname);
}
return pushState.apply(history, arguments);
};
})(window.history);
export default class BrowserRouter extends Component {
state = {
location: { pathname: '/' }
}
getMessage = null
componentDidMount() {
// 这个事件是原生支持的
window.onpopstate = (event) => {
this.setState({
location: {
...this.state.location,
pathname:document.location.pathname,
state:event.state
}
});
};
// 自己实现调用history.pushState(state,title,path)
window.onpushstate = (state,pathname) => {
this.setState({
location: {
...this.state.location,
pathname,
state
}
});
};
}
render() {
let that = this;
let value = {
location: that.state.location,
history: {
push(to) {
if (that.block) {
let allow = window.confirm(that.getMessage(that.state.location));
if (!allow) return;
}
if (typeof to === 'object') {
let { pathname, state } = to;
window.history.pushState(state, '', pathname);
} else {
window.history.pushState('', '', to);
}
},
block(getMessage) {
that.block = getMessage;
},
unblock() {
that.block = null;
}
}
}
return (
<Context.Provider value={value}>
{this.props.children}
</Context.Provider>
)
}
}

相关文档

http://www.zhufengpeixun.cn/2020/html/64.1.router.html