前言
1 | npm init -y |
1 | npm install react react-dom --save-dev |
package.json
1 | "scripts": { |
新建webpack.config.js
1 | const MiniCssExtractPlugin = require("mini-css-extract-plugin"); |
1.删除无用的Css样式
先来看编写的代码
1 | import './index.css' |
index.css
1 | body{ |
1 | npm install purgecss-webpack-plugin glob --save-dev |
这里的
.class1显然是无用的,我们可以搜索src目录下的文件,删除无用的样式
1 | // webpack.config.js |
编译 npm run build
可以看到 dist/css/main.css 中没有.class这个无用的样式
2.图片压缩插件
将打包后的图片进行优化
1 | npm install image-webpack-loader --save-dev |
在file-loader之前使用压缩图片插件
1 | { // 降低分辨率 清晰度 |
可以发现图片大小是有了明显的变化
3.CDN加载文件
我们希望通过cdn的方式引入资源
1 | npm install jquery --save |
index.js
1 | //import $ from 'jquery'; |
全局引入cdn https://www.bootcdn.cn/
1 | <!-- template.html --> |
但现在是在代码中还希望引入jquery来获得提示
1 | import $ from 'jquery'; // 注释打开, 使这个文件应该是cdn加载进来的,如下配置 |
但是打包时依然会将jquery进行打包
webpack.config.js配置如下
1 | externals:{ |
使用插件
在配置文件中标注jquery是外部的,这样打包时就不会将jquery进行打包了,不用在html文件中引入cdn
1 | npm i --save-dev add-asset-html-cdn-webpack-plugin // (这个用的比较少) |
1 | const AddAssetHtmlCdnPlugin = require('add-asset-html-cdn-webpack-plugin') |
4.Tree-shaking && Scope-Hoisting
4.1 Tree-shaking
tree-shaking 默认只支持 es6语法, 因为es6叫静态导入(import),像动态的导入(require(“”)),这种可以放到if else里面,涉及到业务逻辑的,打包的时候是不知道是否需要打包的。
顾名思义就是将没用的内容摇晃掉,来看下面代码
index.js
1 | import { minus } from "./calc"; |
calc.js
1 | export const sum = (a, b) => { |
观察上述代码其实我们主要使用
minus方法, 没有使用sum方法
本项目中使用的是webpack4,只需要将mode设置为production即可开启tree shaking
默认mode:production时 即生产环境下,会自动tree-shaking,但是打包后sum依然会被打印出来
在开发环境下默认tree-shaking不会生效,可以配置标识提示
webpack.base.js
1 | optimization:{ |
移除副作用
calc.js
1 | import {test} from './test'; |
test.js
1 | export const test = ()=>{ |
可以看到上面calc.js中引入了test,但是没有用到test,test文件内部有他自己的业务逻辑。
副作用的代码可能在开发时是无意义的,但是webpack打包后'hello'还是会被打印出来。
在package.json中配置
1 | "sideEffects":false, // 表示不要副作用 |
如果页面中引入的变量没有使用,就移除。
注意
如果这样设置,默认就不会导入css文件啦,因为我们引入css也是通过import './style.css'
这里重点就来了,tree-shaking主要针对es6模块,我们可以使用require语法导入css,但是这样用起来有点格格不入,所以我们可以配置css文件不是副作用
package.json文件:
1 | "sideEffects":[ |
- webpack配置目的:
1) 打包大小
2)打包速度
3)模块拆分
4.2 Scope Hoisting
每个模块都是个函数,函数过多会导致内存过大,每调用一个函数都会产生一个作用域。
作用域提升,可以减少代码体积,节约内存
1 | let a = 1; |
最终打包后的结果会变成
console.log(6)
- 代码量明显减少
- 减少多个函数后内存占用也将减少
5.DllPlugin && DllReferencePlugin
一般用在开发环境下,dll功能:在开发之前就先抽离好 打好包,以后就不用打包了。
每次构建时第三方模块都需要重新构建,这个性能消耗比较大,我们可以先把第三方库打包成动态链接库,以后构建时只需要查找构建好的库就好了,这样可以大大节约构建时间
1 | import React from 'react'; |
5.1 DllPlugin
动态链接库
这里我们可以先将
react、react-dom单独进行打包
单独打包创建webpack.dll.js
1 | const path = require('path'); |
执行"webpack --config webpack.dll.js命令,可以看到dll目录下创建了两个文件分别是manifest.json,react.dll.js
本地使用了import React 这样的语法,需要先去 manifest.json查找,找到后会加载对应的库的名字,可能会引用某个模块,会去.dll.js文件中查找
5.2 DllReferencePlugin
现在我们的项目中可以引用刚才打包好的动态链接库
1 | npm install add-asset-html-webpack-plugin --save-dev |
webpack.config.js
1 | const DllReferencePlugin = require('webpack/lib/DllReferencePlugin'); |
使用DllPlugin可以大幅度提高构建速度
6.动态加载
实现点击后动态加载文件
1 | let btn = document.createElement('button'); |
这就是懒加载原理,webpack会默认把 这样import('./video') 的语法单独打包成一个文件,等点击的时候会使用jsonp动态的去加载这个文件
可以实现代码分割
给动态引入的文件增加名字
1 | output:{ |
这样打包后的结果最终的文件就是 video.min.js
原理就是
jsonp动态导入,动态创建script标签 去加载这个文件。
7.打包文件分析工具
可以分析打包后的代码依赖关系,包括打包的大小。
安装 webpack-bundle-analyzer插件
1 | npm install --save-dev webpack-bundle-analyzer |
使用插件
1 | const {BundleAnalyzerPlugin} = require('webpack-bundle-analyzer'); |
默认就会展现当前应用的分析图表
8.SplitChunks
这是webpack自身的一个配置,基本上每个开发者都会用到,它可以在生产环境下帮我们把很多的第三方包进行分离。
dllPlugin 不要和 splitChunks 共同使用,一般会先走dllPlugin,就不会走splitChunks。
我们在来看下SplitChunks这个配置,他可以在编译时抽离第三方模块、公共模块
将项目配置成多入口文件
1 | entry:{ |
我们让a,b两个模块同时引用jquery,别忘了去掉之前的externals配置

如上所示,同样的 jquery被打包了2次
- 抽离第三方模块
1)不要和业务逻辑放在一起
2)增加缓存
配置SplitChunks插件
配置在此,已做部分修改,默认配置可在https://npmjs.com 上自行查找。
1 | optimization:{ |
我们将
async改为initial

可以看到jquery 被单独打包出来了。
注意
我们再为每个文件动态导入lodash库,并且改成async
1 | import('lodash') |

可以看到现在配置的是异步代码分割,同步的jquery还是分别在a、b中打包了,而异步引入的 loader 被抽离出来打包。
注意
现在为每个入口引入c.js,并且改造配置文件
1 | splitChunks: { |

9.热更新
模块热替换(HMR - Hot Module Replacement)是 webpack 提供的最有用的功能之一。它允许在运行时替换,添加,删除各种模块,而无需进行完全刷新重新加载整个页面
- 保留在完全重新加载页面时丢失的应用程序的状态
- 只更新改变的内容,以节省开发时间
- 调整样式更加快速,几乎等同于就在浏览器调试器中更改样式
启用热更新,默认样式可以支持热更新,如果不支持热更新则采用强制刷新
1 | devServer:{ |
让js支持热更新
1 | import sum from './sum'; |
10.IgnorePlugin
忽略 import和require语法
1 | new webpack.IgnorePlugin(/^\.\/locale$/, /moment$/) |
当代码中是在全局的地方配置的语言包,如下:
1 | import {ConfigProvider} from 'antd'; |
所以配置如下:
1 | new webpack.IgnorePlugin(/^\.\/locale$/, /antd\/es$/) |
打包之后的体积分析,并没有变化…待解释。
11.费时分析
可以计算每一步执行的运行速度
1 | const SpeedMeasureWebpackPlugin = require('speed-measure-webpack-plugin'); |
12.noParse
module.noParse,对类似jq这类依赖库,内部不会引用其他库,我们在打包的时候就没有必要去解析,这样能够增加打包速率
1 | noParse:/jquery/ |
这里用noParse:/lodash/测试,构建和打包时间分析都没有明显的变化….待解释。
13.resolve
1 | resolve: { |
这里用modules:[path.resolve(__dirname, "/node_modules")]测试,报依赖错误…待解释。
14.include/exclude
在使用loader时,可以指定哪些文件不通过loader,或者指定哪些文件通过loader
1 | { |
exclude 权重更高,exclude 会覆盖 include 里的配置。
webpack 里几乎所有 loader 都支持 include 和 exclude 属性,上述例子虽然是基于 babel-loader,但以上结论一样适用于其它 loader。
[举例]
[使用include]
1 | { |
没有配置include时,打包耗时如下: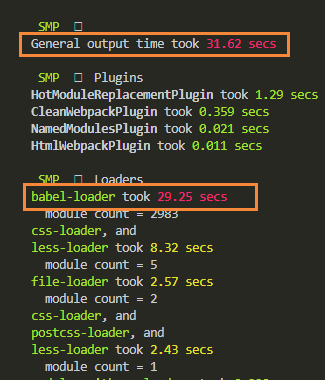
配置了include后,打包耗时如下: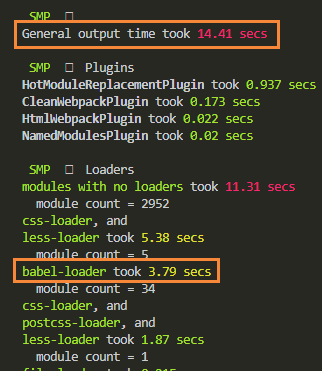
[使用exclude]
1 | { |
配置了exclude后,构建耗时如下: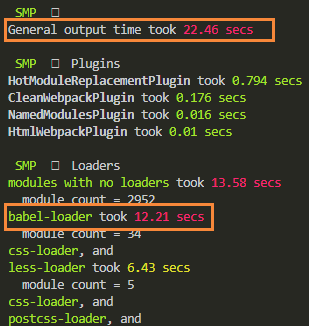
15.happypack
多线程打包,我们可以将不同的逻辑交给不同的线程来处理
1 | npm install --save-dev happypack |
使用插件
1 | const HappyPack = require('happypack'); |