Nodejs-Koa(一)

Koa

koa官网 http://koajs.cn

初始化

1
2
npm init -y
npm install koa

不管看什么源码 第一步 node_modules/koa/package.json 找package.json文件,找里面的main 这里是 “main”: “lib/application.js”, 然后再去lib找 application.js

使用

1
2
3
4
5
6
7
8
9
10
11
12
13
14
15
16
17
// 1.helloword.js
const Koa = require('koa');
const app = new Koa();

// node有原生的 req res(原生)
// request response (koa自己封装的) 又增加了很多的方法
// ctx代理了 req res request response
app.use(ctx => { // ctx代表上下文
// console.log(ctx.request.path);// / // 现在就不用记是request、response的方法直接如下:
console.log(ctx.path); // /
// 本来这里结束可以用res.end();但是官网上说尽量避免使用node属性 所以现在如下:
// ctx.body = {name: 'jf'}; // 运行 浏览器输出 {"name":"jf"}
// 当然也可以还是用之前的
ctx.res.end('hello'); // 运行 浏览器输出 hello
});
app.listen(3000);
// 运行 nodemon 1.helloword.js 浏览器访问 http://localhost:3000/?a=1

Context 上下文 http://koajs.cn/#-context-

手写Koa原理

新建文件夹koa koa/application.js

1
2
3
4
5
6
7
8
// 2.server.js
const Koa = require('./koa/application'); // 核心逻辑,这里对照原生koa/lib/下的文件,新建context.js|request.js|response.js

const app = new Koa();
app.use((req, res) => {
res.end('hello word');
})
app.listen(4000);

application.js

1
2
3
4
5
6
7
8
9
10
11
12
13
14
15
16
17
18
19
20
// ./koa/application.js

// 需要导出一个Koa类
const http = require('http');
class Application {
// 如上面 `2.server.js` line1-8 有2个方法use、listen
use(fn){ // 注册方法
this.fn = fn;
}
handleRequest(req, res){
this.fn(req,res);
}
listen(...args){ // 监听端口
let server = http.createServer(this.handleRequest.bind(this));
server.listen(...args);
}
}
module.exports = Application;
// 运行 nodemon 2.reserver.js , 浏览器运行localhost:4000
// 可以看到浏览器打印出hello word

功能上基本类似 但是 2.server.js line5这里不是req、res 而是ctx 如下:
新建 context.js    request.js    response.js

1
2
3
// context.js
let context = {};
module.exports = context;
1
2
3
// request.js
let request = {};
module.exports = request;
1
2
3
// response.js
let response = {};
module.exports = response;
1
2
3
4
5
6
7
8
9
10
11
12
13
14
15
16
17
18
19
20
21
22
23
24
// 2.server.js
const Koa = require('./koa/application');
//const Koa = require('koa');
const app = new Koa();

app.use(ctx => { // 这里修改成ctx
// res.end('hello word');
// 原生****************************************
// 原生的写法 line3打开注释
// console.log(ctx.req.url); // /
// console.log(ctx.request.req.url); // /
// //line10、11调用的是原生的、line13、14调用的是自己封装的
// console.log(ctx.request.url); // /
// console.log(ctx.url);
// end ***************************************

// 引用自己的写的Koa
console.log(ctx.req.url); // / 这个req是原生的
console.log(ctx.request.req.url); //
console.log(ctx.request.url); // 这里必须要把req放到request上,才可以在request上拿到req的属性
console.log(ctx.url);// 它的原理非常像vue ctx.url => ctx.request.url 代理
console.log(ctx.path);
})
app.listen(4000);
1
2
3
4
5
6
7
8
9
10
11
12
13
14
15
16
17
18
19
20
21
22
23
24
25
26
27
28
29
30
31
32
33
34
35
36
37
38
39
40
41
42
43
44
45
46
// ./koa/application.js
// ctx需要整合req res
// 封装request和response对象 把他放到ctx上
// 现在分别初始化创建这个三个文件里的对象
let context = require('./context');
let request = require('./request');
let response = require('./response');
// 这些属性可能在后序的逻辑中都会用到,全局的话放在constructor中


const http = require('http');
class Application {
constructor(){
this.context = context;
this.request = request;
this.response = response;
// 看下源码 这里需要修改下
}
use(fn){ // 注册方法
this.fn = fn;
}
createContext(req, res){
// 表示context继承this.context且不会破坏原有的对象,方便扩展
let context = Object.create(this.context); // 每次都创建全新的上下文
context.request = Object.create(this.request);
context.response = Object.create(this.response);
// 我在koa自己的封装的对象上增加 req和res属性
context.req = context.request.req = req;
context.res = context.response.res = res;
// 上面对应 `2.server.js` line 18、19
// `2.server.js` line20见request.js
return context;
}
handleRequest(req, res){
// 创建上下文
let ctx = this.createContext(req, res);
this.fn(ctx);
// this.fn(req,res);
}
listen(...args){ // 监听端口
let server = http.createServer(this.handleRequest.bind(this));
server.listen(...args);
}

}
module.exports = Application;

request.js

1
2
3
4
5
6
7
8
9
10
11
12
13
14
15
16
17
18
// request.js   是扩展request属性
let url = require('url');
// request.js 是扩展request属性,所以这里不能像context一样用代理,可以从context的'return this[property][key];' 这行看出它值的获取是基于request的值 即当前文档

let request = { // 这里对应2.server.js line20
get url(){ // 属性访问器 可以帮助我们处理复杂逻辑
// console(this); // 这里谁调用它就是指谁 这里是ctx.request,所以this等价于ctx.request
// return '/';
return this.req.url;
},
get method(){
return this.req.method
},
get path(){
return url.parse(this.req.url).pathname
}
};
module.exports = request;

context.js

1
2
3
4
5
6
7
8
9
10
11
// context.js  代理功能
let context = {

};
//实现代理功能 这里也可以用proxy写
context.__defineGetter__('url',function(){
// 这个context是我们自己创建的
// let ctx = Object.create(context);
return this.request.url; // 谁调的this指谁,这里是2.server.jsline21,里面ctx调的,所以指的是ctx
})
module.exports = context;

现在 2.server.js line22又增加了一个path属性,也需要代理, 统一封装,如下:

1
2
3
4
5
6
7
8
9
10
11
12
13
14
15
16
17
// context.js
let context = {
};
// context.js是代理的功能
function defineGetter(property,key){
context.__defineGetter__(key,function(){
// 这个context是我们自己创建的
// let ctx = Object.create(context)
return this[property][key];
});
}
defineGetter('request','url');
defineGetter('request','method');
defineGetter('request','path');
// 分析:给line6的context做了一个代理属性,属性key,line9真正是从request取,当前从ctx取url 其实是ctx.request的url,line9的this,谁调的就是指谁,2.server.jsline21、22是ctx调的,那就是指ctx

module.exports = context;

下一部分 2.server.js

1
2
3
4
5
6
7
8
9
10
11
12
13
14
15
16
17
18
19
20
21
22
23
24
25
26
27
28
29
30
31
32
33
34
35
36
37
38
39
// 2.server.js
const Koa = require('./koa/application');
// const Koa = require('koa');
const app = new Koa();

app.use(ctx => { // 这里修改成ctx
// res.end('hello word');
// 原生的写法 line17打开注释
// console.log(ctx.req.url); // /
// console.log(ctx.request.req.url); // /
// //line24、25调用的是原生的、line27、28调用的是自己封装的
// console.log(ctx.request.url); // /
// console.log(ctx.url);

// 当前的
// console.log(ctx.req.url); // / 这个req是原生的
// console.log(ctx.request.req.url); //
// console.log(ctx.request.url); // 这里必须要把req放到request上,才可以在request上拿到req的属性
// console.log(ctx.url);// 它的原理非常像vue ctx.url => ctx.request.url 代理
// console.log(ctx.path);


// 下一部分****************
// 用原生
// ctx.response.body = 'hello word';
// console.log(ctx.body);
//或者
// ctx.body = 'hello word';
// console.log(ctx.response.body);
// 也是一样的
// 现在用自己的写 看response.js文件
// 自己的
ctx.response.body = 'hello word';
console.log(ctx.body);
// 反过来
ctx.body = 'hello word';
console.log(ctx.response.body);
})
app.listen(4000);

response.js

1
2
3
4
5
6
7
8
9
10
11
// response.js
let response = {
_body: '',
get body(){
return this._body;
},
set body(newValue){
this._body = newValue;
}
};
module.exports = response;

context.js

1
2
3
4
5
6
7
8
9
10
11
12
13
14
15
16
17
18
19
20
21
22
23
24
25
26
27
// context.js
let context = {
};

// context.js是代理的功能
function defineGetter(property,key){
context.__defineGetter__(key,function(){
return this[property][key];
});
}
defineGetter('request','url');
defineGetter('request','method');
defineGetter('request','path');

// 2.server.js line33、34
defineGetter('response','body');

// 2.server.js line36、37
function defineSetter(property,key){
// 这里是__defineSetter__(key, 给key即(body)设置属性的时候添加的代理
context.__defineSetter__(key,function(newValue){
this[property][key] = newValue;
});
}
defineSetter('response','body');

module.exports = context;

中间件

Koa 应用程序是一个包含一组中间件函数的对象,它是按照类似堆栈的方式组织和执行的。

next

3.helloword.js

1
2
3
4
5
6
7
8
9
10
11
12
13
14
15
16
17
18
19
20
21
22
// 3.helloword.js
const Koa = require('koa');

const app = new Koa();
// next
app.use((ctx,next) => {
console.log(1);
next();
console.log(4);
});
app.use((ctx,next) => {
console.log(2);
next();
console.log(5);
});
app.use((ctx,next) => {
console.log(3);
next();
console.log(6);
});
app.listen(3000);
// 执行结果: 1 2 3 6 5 4

组合成了一个大的函数 相当于如下:

1
2
3
4
5
6
7
8
9
10
11
12
13
14
// 3.helloword.js
app.use((ctx,next) => {
console.log(1);
(ctx,next) => {
console.log(2);
((ctx,next) => {
console.log(3);
next();
console.log(6);
}();
console.log(5);
}();
console.log(4);
});

如图:

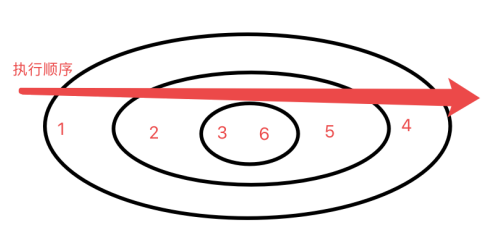
这个叫中间件 我可以在执行某个过程中 之前增加某些逻辑
中间件 use方法 它可以决定是否向下执行(调next就向下走)
这里可以使用async+await方法

1】

1
2
3
4
5
6
7
8
9
10
11
12
13
14
15
16
17
18
19
20
21
22
23
24
25
26
27
28
29
30
// 3.helloword.js
const Koa = require('koa');

const app = new Koa();
const logger = ()=>{
return new Promise((resolve, reject)=>{
setTimeout(() => {
console.log('logger');
resolve();
}, 1000);
})
}
app.use(async (ctx,next) => {
console.log(1);
await logger();
next();
console.log(4);
});
app.use((ctx,next) => {
console.log(2);
next();
console.log(5);
});
app.use((ctx,next) => {
console.log(3);
next();
console.log(6);
});
app.listen(3000);
// 执行结果:1 过一秒打印logger 23654

2】

1
2
3
4
5
6
7
8
9
10
11
12
13
14
15
16
17
18
19
20
21
22
23
24
25
26
27
28
29
30
// 3.helloword.js
const Koa = require('koa');

const app = new Koa();
const logger = ()=>{
return new Promise((resolve, reject)=>{
setTimeout(() => {
console.log('logger');
resolve();
}, 1000);
})
}
app.use((ctx,next) => {
console.log(1);
next(); // 当前执行next的时候 没有等待next执行完, 但是外层的已经执行完了所以会继续执行 =>4
console.log(4);
});
app.use(async (ctx,next) => {
console.log(2);
await logger();
next();
console.log(5);
});
app.use((ctx,next) => {
console.log(3);
next();
console.log(6);
});
app.listen(3000);
// 执行结果: 124 logger365

分析: 1 , line14的next() 就是line17-22

1
2
3
4
5
6
async (ctx,next) => {
console.log(2);
await logger();
next();
console.log(5);
}

这个方法 =>2, next()没有等待执行完 所以 =>4 logger =>3=>6=>5

3】

1
2
3
4
5
6
7
8
9
10
11
12
13
14
15
16
17
18
19
20
21
22
23
24
25
26
27
28
29
30
31
32
33
34
35
36
37
// 3.helloword.js
const Koa = require('koa');

const app = new Koa();
const logger = ()=>{
return new Promise((resolve, reject)=>{
setTimeout(() => {
console.log('logger');
resolve();
}, 1000);
})
}
app.use((ctx,next) => {
console.log(1);
ctx.body = 'hello';
next();
ctx.body = 'hello4';
console.log(4);
});
app.use(async (ctx,next) => {
console.log(2);
ctx.body = 'hello1';
await logger();
next();
ctx.body = 'hello5';
console.log(5);
});
app.use((ctx,next) => {
console.log(3);
ctx.body = 'hello2';
next();
ctx.body = 'hello5';
console.log(6);
});
app.listen(3000);
// 运行 nodemon 3.helloword.js
// 浏览器运行 http://localhost:3000

浏览器获取到服务端返回的 ‘hello4’ 因为这里line16 next()方法外层已经执行完了,所以服务器端返回

4】

1
2
3
4
5
6
7
8
9
10
11
12
13
14
15
16
17
18
19
20
21
22
23
24
25
26
27
28
29
30
31
32
33
34
35
// 3.helloword.js
const Koa = require('koa');

const app = new Koa();
const logger = ()=>{
return new Promise((resolve, reject)=>{
setTimeout(() => {
console.log('logger');
resolve();
}, 1000);
})
}
app.use(async (ctx,next) => {
console.log(1);
ctx.body = 'hello';
await next(); // ****这里加了 await
ctx.body = 'hello4';
console.log(4);
});
app.use(async (ctx,next) => {
console.log(2);
ctx.body = 'hello1';
await logger();
next();
ctx.body = 'hello5';
console.log(5);
});
app.use((ctx,next) => {
console.log(3);
ctx.body = 'hello2';
next();
ctx.body = 'hello5';
console.log(6);
});
app.listen(3000);

这样就会等待 next() 这个函数完全执行完再返回 hello4
执行: 浏览器会过1秒之后再返回

5】

1
2
3
4
5
6
7
8
9
10
11
12
13
14
15
16
17
18
19
20
21
22
23
24
25
26
27
28
29
// 3.helloword.js
const Koa = require('koa');

const app = new Koa();
const logger = ()=>{
return new Promise((resolve, reject)=>{
setTimeout(() => {
console.log('logger');
resolve();
}, 1000);
})
}
app.use(async (ctx,next) => {
ctx.body = 'hello';
// await next();
return next(); // 也可以这样写 这里next()返回一个promise, 会等待promise执行完,和await的区别是await后面还是执行代码,return不行
// 如果上面是写的await 这里还可以有其他的todo...
});
app.use(async (ctx,next) => {
await logger();
// ctx.body = '500';
return next(); // 这里如上 也可以用return
});
app.use(async (ctx,next) => {
return next(); // 这里是最后一个next()前面可以不用加,但是不一定是最后一个,所以都加上
});
app.listen(3000);

// 现在上面的方法是等所有都执行完再返回 所以当line21注释打开的话,服务端返回的是500

在使用koas时如果遇到next 前面就可以加 return 或者await
koa里面有个compose方法 会将所有方法组合成一个大的promise 如果没有加如上的return 或者async await 代码可能没有执行完就返回了

6】

计算执行的时间

1
2
3
4
5
6
7
8
9
10
11
12
13
14
15
16
17
18
19
20
21
22
23
24
25
26
27
// 3.helloword.js
const Koa = require('koa');

const app = new Koa();
const logger = ()=>{
return new Promise((resolve, reject)=>{
setTimeout(() => {
console.log('logger');
resolve();
}, 1000);
})
}
app.use(async (ctx,next) => {
console.time('start'); // ***
ctx.body = 'hello';
await next();
console.timeEnd('start'); // ***
});
app.use(async (ctx,next) => {
await logger();
return next();
});
app.use(async (ctx,next) => {
return next();
});
app.listen(3000);
// 执行 可以看到命令行打印出时间 start: 1007.369ms

完善

现在看 ./koa/application 方法整合
手写compose方法

1
2
3
4
5
6
7
8
9
10
11
12
13
14
15
16
17
18
19
20
21
22
23
24
25
26
27
28
29
30
31
32
33
34
35
36
// 4.helloword.js  引入自己的application.js
const Koa = require('./koa/application');
const fs = require('fs');

const app = new Koa();
const logger = () => {
return new Promise((resolve, reject) => {
setTimeout(() => {
console.log("logger");
resolve();
}, 1000);
});
};
app.use(async (ctx, next) => {
console.log(1);
await next();
});
app.use(async (ctx, next) => {
// 上下文
console.log(2);
await logger();
return next();
});
app.use(async (ctx, next) => {
// 上下文
console.log(3);
await next();
// 如果返回的是个文件
ctx.body = fs.createReadStream('2.server.js');
// 如果返回的是个对象
ctx.body = {name: 'jf'};
});
app.on('error',function(err){ // 当任何一个中间件出错的时候都能捕获
console.log(err);
})
app.listen(3000);
1
2
3
4
5
6
7
8
9
10
11
12
13
14
15
16
17
18
19
20
21
22
23
24
25
26
27
28
29
30
31
32
33
34
35
36
37
38
39
40
41
42
43
44
45
46
47
48
49
50
51
52
53
54
55
56
57
58
59
60
61
62
63
64
65
66
// application.js
let context = require('./context');
let request = require('./request');
let response = require('./response');

const http = require('http');
const Events = require('events');
const Stream = require('stream');
class Application extends Events {
constructor(){
super(); // ***这个不要忘记了
this.context = context;
this.request = request;
this.response = response;
this.middleware = [];
}
use(fn){
// this.fn = fn;
this.middleware.push(fn);
}
createContext(req, res){
let context = Object.create(this.context);
context.request = Object.create(this.request);
context.response = Object.create(this.response);
context.req = context.request.req = req;
context.res = context.response.res = res;
return context;
}
compose(ctx){ // 返回的是个promise 这里看下源码 koa/lib/application
// [fn, fn, fn]
let dispatch = (index) =>{
if(index === this.middleware.length) return Promise.resolve();
let middle = this.middleware[index];
// 拿出第一个中间件让其执行,执行的时候传递ctx,next方法,有可能这个方法是个普通函数,那么就把他变成一个promise
return Promise.resolve(middle(ctx, ()=>dispatch(index+1)));
}
return dispatch(0);
// 这里写完之后 新建4.helloword.js 引入当前文件验证 1 2 logger 3

}
handleRequest(req, res){
let ctx = this.createContext(req, res);
// this.fn(ctx);
this.compose(ctx).then(()=>{
let _body = ctx.body;
if(_body instanceof Stream){
return _body.pipe(res);
}else if(typeof _body === 'object'){ //如果是对象
return res.end(JSON.stringify(_body));
}else{ // 普通字符串
return res.end(_body);
}
}).catch(err=>{ // 这里捕获错误 触发 `4.helloword.js`
// 继承events
this.emit('error',err);
})
}
listen(...args){
let server = http.createServer(this.handleRequest.bind(this));
server.listen(...args);
}
}
module.exports = Application;
// 1) compose方法 如何用async+await来重写
// 2) compose next方法如何 避免多次调用(连着写多个next())
// 3) ctx.body 没有赋值 如何处理